
How to Remove Virus From Laptop – If your laptop has ever suddenly become slow, started showing strange pop-ups, or opened things you didn’t click, you know how frustrating and even scary it can feel. That was exactly what happened to me some time ago. I was trying to download a “free” software online.
Everything looked normal at first. But within a short time:
- My laptop became very slow
- Strange adverts started popping up
- My browser homepage changed by itself
- Some of my files disappeared
At that moment, I realized I had unknowingly installed a virus. That experience forced me to learn how to remove virus from laptop properly and, more importantly, how to prevent it from happening again.
In this guide, I will walk you through everything — in a simple way — so that no matter where you are in the world, you can detect a virus early, remove it safely, and protect your laptop from now on
Let’s begin.
What is a Computer Virus?
A computer virus is a harmful program designed to:
- Damage your system
- Steal your information
- Spy on your activity
- Slow down your laptop
- Control your device without your permission
Think of it like a sickness in your body. If you don’t treat it early, it can spread and become worse.
Common Ways Viruses Enter Your Laptop
Most infections happen because of everyday actions like:
- Downloading free cracked software
- Clicking unknown links
- Opening suspicious email attachments
- Using infected USB drives
- Visiting unsafe websites
Even smart people fall into this. So don’t feel bad if it has happened to you.
Signs Your Laptop Has A Virus
Before you remove a virus, you must first recognize it. So you have to watch out for these signs:
- The laptop suddenly becomes slow
- Too many pop-up ads
- New programs appear without installing them
- The browser keeps redirecting you
- Antivirus turns off by itself
- Files disappear or get corrupted
- Internet data finishes quickly
My personal experience
In my own case:
- My fan kept running loudly
- My browser opened random pages
- I saw ads even when I wasn’t browsing
That was when I knew something was wrong.
Before You Remove the Virus, Do This
Before you start removing anything, take these steps first.
1. Disconnect your internet
This prevents the virus from sending your data to hackers.
2. Back up your important files
Save your:
- Documents
- Pictures
- Business files
Use:
- Flash drive
- External hard drive
- Google Drive or cloud storage
3. Stop opening unknown files
Avoid clicking anything suspicious during this time.
READ THIS: How to Protect Your Online Accounts from Hackers
How To Remove Virus From Laptop
Now, let’s go into the real solution. Make sure to adhere to the steps given below carefully.
Step 1: Start Your Laptop In Safe Mode
Safe Mode allows your laptop to run with only basic programs, making it easier to remove viruses. Safe Mode is a special way of starting your laptop where only the essential system programs run. This makes it easier to detect and remove viruses because most malware will not run in Safe Mode.
How to Enter Safe Mode
There are two easy methods you can use depending on your situation.
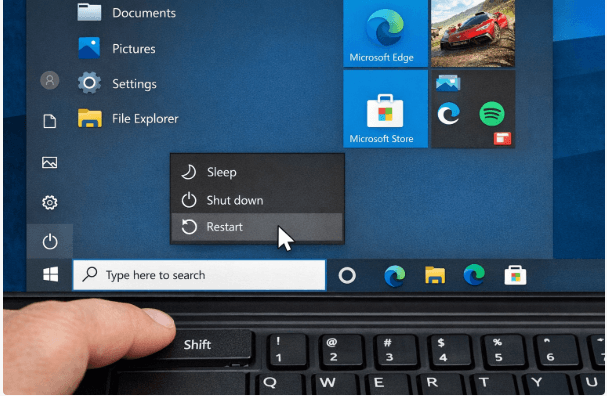
Method 1: Using Shift + Restart (Easiest Method)
This is the most reliable method for Windows 10 and Windows 11.
Follow these steps carefully:
- Save your work
Before restarting your laptop, make sure you:
Save any open documents
Close all programs
This prevents data loss.
- Open the Power Menu
- Click the Start button (Windows icon at the bottom left of your screen).
- Then click on the Power icon.
- Hold the SHIFT key and click Restart
Now do this:
- Press and hold down the SHIFT key on your keyboard
- While holding SHIFT, click Restart
Do not release the SHIFT key until your laptop starts restarting.
- Wait for the Advanced Options screen
Your laptop will restart and show a blue screen with options.
You will see something like:
Continue
Troubleshoot
Turn off your PC
Click: Troubleshoot
- Go to Advanced Options
- On the next screen, click: Advanced Options
- Open Startup Settings
- Next, click: Startup Settings
- You will now see information about startup options like Safe Mode.
- Click Restart again
- At the bottom of the screen, click: Restart
Your laptop will restart again.
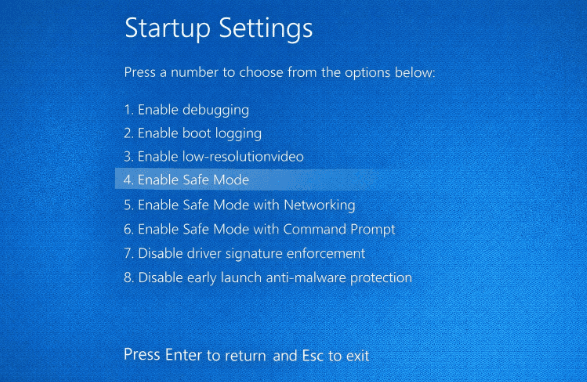
- Select the Safe Mode option
After restarting, you will see a list of numbered options like:
1 – Enable debugging
2 – Enable boot logging
3 – Enable low-resolution video
4 – Enable Safe Mode
5 – Enable Safe Mode with Networking
6 – Enable Safe Mode with Command Prompt
At the bottom of the screen, click: Restart
Your laptop will restart again.
- Press number 4 on your keyboard to enter Safe Mode
OR
- Press number 5 to enter Safe Mode with Networking (this allows internet access)
Which Safe Mode Should You Choose?
Choose Safe Mode (Option 4) if you just want to remove the virus offline
Choose Safe Mode with Networking (Option 5) if you need the internet to download antivirus tools
Method 2: Using F8 Key (Older Method – May not work on All Laptops)
Some older laptops allow Safe Mode using the F8 key.
Steps:
Turn off your laptop
Turn it on again
Immediately start pressing the F8 key repeatedly
A menu will appear
Select Safe Mode
Note: On many newer laptops, F8 is disabled by default, so this method may not work.
How to Confirm You Are in Safe Mode
When Safe Mode is active, you will notice:
- The screen looks simple
- The background may be black
- The words “Safe Mode” appear at the corners of your screen
- Only basic programs are running
This confirms that you are now in Safe Mode.
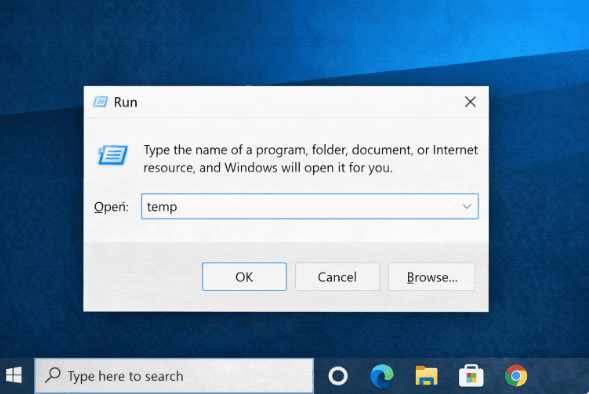
Step 2: Delete Temporary Files
Viruses sometimes hide in temporary files. So you have to do this:
- Press Windows + R
- Type temp
- Delete everything
Repeat for:
- %temp%
- prefetch
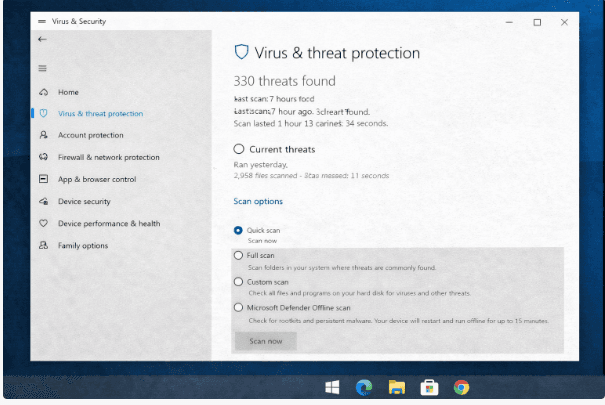
Step 3: Run Windows Security Scan
Windows has a built-in antivirus. To run the scan, simply follow the steps below.
- Go to Settings
- Click Privacy & Security
- Open Windows Security
- Select Virus & Threat Protection
- Run Full Scan

Step 4: Use a Strong Antivirus Tool
For better cleaning, install a trusted antivirus such as:
- Malwarebytes
- Avast
- Kaspersky
- Bitdefender
Run a full scan and remove all threats found.
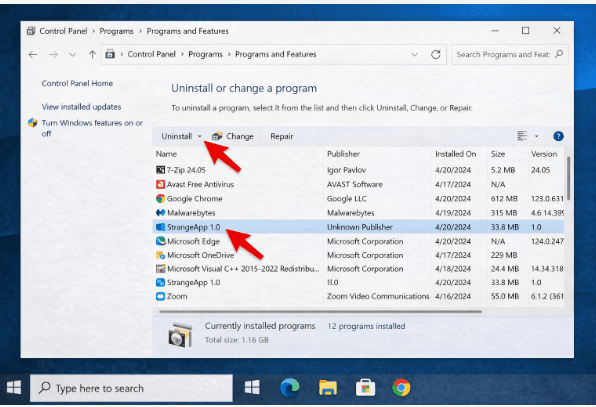
Step 5: Remove Suspicious Programs
Go to Control Panel → Programs
Uninstall anything:
- You don’t recognize
- Recently installed without your knowledge
Step 6: Clean Your Browser
Viruses often affect browsers.
Do this:
- Remove strange extensions
- Reset browser settings
- Clear history and cookies
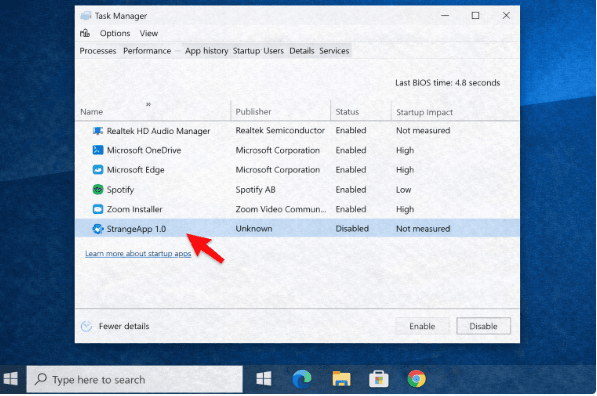
Step 7: Disable Virus Startup Programs
- Press Ctrl + Shift + Esc
- Open Task Manager
- Click Startup
- Disable unknown programs
Step 8: Scan Again
After cleaning, run another full scan to be sure your laptop is now clean.
Alternative Options if the Virus Remains
After taking the steps above and the virus still does not go away, it means the infection is strong, so use these options;
- Option 1: System Restore
Restore your laptop to a previous safe date.
- Option 2: Reset your PC
Keep your files, but reinstall Windows.
- Option 3: Full format
This removes everything and gives you a fresh system.
How to Prevent Viruses in the Future
After removing a virus, prevention is very important. Follow these simple habits to prevent viruses in the future.
- Don’t download cracked software
- Avoid suspicious websites
- Use antivirus software
- Keep Windows updated
- Scan USB drives before opening
- Use strong passwords
- Turn on the firewall
Real Result After Removal
After I cleaned my laptop:
- It became fast again
- No more pop-ups
- My files came back
- Browsing became smooth
That experience changed how I use my laptop forever.
Common Mistakes People Make
Avoid these:
- Ignoring warning signs
- Installing too many antivirus apps
- Clicking random download buttons
- Not updating their system
- Using pirated software
Advanced Security Tips
If you want extra safety, then do the following
- Use a VPN
- Enable two-factor authentication
- Back up files regularly
- Use cloud storage
- Avoid public Wi-Fi for sensitive work
Frequently Asked Questions (FAQs)
How do I know for sure my laptop has a virus?
If your laptop shows unusual behavior like slowness, pop-ups, browser redirects, or unknown apps, it likely has malware. A full antivirus scan will confirm it.
Can I remove a virus without antivirus software?
Yes, you can remove it manually using Safe Mode and uninstalling programs. But antivirus tools make the process faster, safer, and more complete.
Will a factory reset remove all viruses?
Yes. A full reset or reinstall of Windows removes all viruses because it wipes the system completely.
Is a free antivirus good enough?
Free antivirus software is good for basic protection. But for stronger protection, premium versions give better security features.
Can a virus steal my bank details?
Yes, some viruses, like spyware or keyloggers, can steal sensitive data. That is why removing them quickly is very important.
Can my laptop get a virus from a USB drive?
Yes. If a USB drive is infected and you plug it in, it can transfer a virus to your laptop.
Can I remove a virus using my phone?
No. Virus removal must be done on the laptop itself using antivirus tools or system settings.
Why does my laptop keep getting infected?
Common reasons include:
- Downloading cracked software
- Clicking unknown links
- No antivirus installed
How often should I scan my laptop?
At least once every week for safety.
What is the best way to stay safe permanently?
The best protection is:
- Use antivirus
- Avoid risky downloads
- Keep your system updated
- Be careful online
Conclusion
Learning how to remove virus from laptop is a powerful digital skill that protects your files, your privacy, and your peace of mind. You don’t need to be a computer expert to fix this problem; you only need the right steps, patience, and good habits.
So take the steps given above today, and you’ll be very much good to go.
If this guide helped you, kindly share it with someone, bookmark it for future use, and always visit Educatefresh.com for more helpful guides.